并发#
走进并行世界#
你必须知道的几个概念#
-
1葛一鸣, 郭超. 实战Java高并发程序设计[M]. 电子工业出版社, 2015.
同步(Synchronous)和异步(Asynchronous)1葛一鸣, 郭超. 实战Java高并发程序设计[M]. 电子工业出版社, 2015.
并发(Concurrency)和并行(Parallelism)
临界区:一种公共资源或共享数据,可被多个线程使用
阻塞(Blocking)和非阻塞(Non-Blocking)
死锁(Deadlock)、饥饿(Starvation)和活锁(Livelock)
并发级别#
阻塞(Blocking)
无饥饿(Starvation-Free):解决公平问题。
无障碍(Obstruction-Free):都可以进入临界区,出现问题回滚。
无锁(Lock-Free):都进入临界区,且有一个在有限步可以得到执行。
无等待(Wait-Free):都进入临界区,都可以在有限步得到执行。
两个重要定律#
Amdahl 定律:加速比的计算公式和理论上限。
Gustafson 定律:同上,以不同的角度分析问题。
Java 内存模型(JMM)#
原子性(Atomicity):多个线程不会互相干扰。
可见性(Visibility):一个线程修改了值之后,其他线程能否立马看到结果。
有序性(Ordering):编译器可能对代码重新排序,导致多线程运算结果出错。
一个不符合原子性的例子
/**
 * 测试原子性,确保运行环境为 32 位虚拟机
 * 64 位机器不会出现问题
 */

public class MultiThreadLong {
    public static long t = 0;

    public static class ChangeT implements Runnable {
        private long to;

        public ChangeT(long to) {
            this.to = to;
        }

        @Override
        public void run() {
            while(true) {
                MultiThreadLong.t = to;
                Thread.yield();
            }
        }
    }

    public static class ReadT implements Runnable {
        @Override
        public void run() {
            while(true) {
                long tmp = MultiThreadLong.t;

                if (tmp != 111L && tmp != -999L && tmp != 333L && tmp != -444L) {
                    System.out.println(tmp);
                }

                Thread.yield();
            }
        }
    }

    public static void main(String[] args) {
        new Thread(new ChangeT(111L)).start();
        new Thread(new ChangeT(-999L)).start();
        new Thread(new ChangeT(333L)).start();
        new Thread(new ChangeT(-444L)).start();
        new Thread(new ReadT()).start();
    }
}
不能指令重排的指令#
一个线程内语义的串行性
volatile写先于读,保证可见性解锁先于加锁
线程的
start()先于它的每个动作线程操作先于
Thread.join()interrupt()先于中断后的代码构造函数先于
finalize()
Java 并行程序基础#
有关线程你必须知道的事#
进程是线程的容器,线程是最基本的执行单元。
线程间的切换和调度的成本远远小于进程。
线程的几种基本状态,在 Thread 中的 State 枚举中定义了:
public enum State {
    NEW,            // 创建态:操作系统为新进程分配资源,创建 PCB
    RUNNABLE,       // 就绪态或运行态:等待 CPU 分配时间片
    BLOCKING,       // 阻塞态:因 synchronized 阻塞,等待解锁
    WAITING,        // 等待态:等待唤醒继续执行
    TIMED_WAITING,  // 超时等待态:等待唤醒或时间片到继续执行
    TERMINATED;     // 终止态:操作系统回收资源,撤销 PCB
}
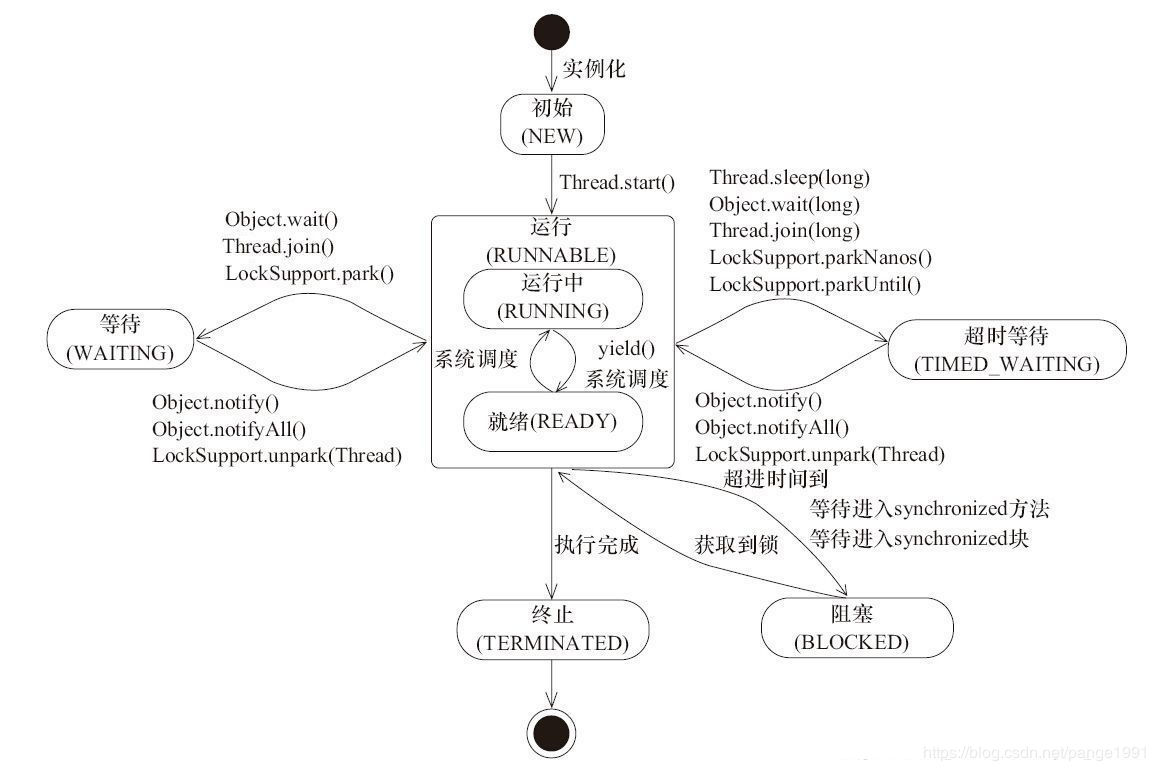
Fig. 17 Java 线程状态图#
初识线程:线程的基本操作#
新建线程#
方法一:通过继承 Thread 类,重写 run() 方法。
public class NewThead {
    public static void main(String[] args) {
        Thread t1 = new Thread() {
            @Override
            public void run() {
                System.out.println("hello world");
            }
        };
        t1.start();
    }
}
方法二:通过实现 Rannable 接口。
public class NewThread2 implements Runnable {
    @Override
    public void run() {
        System.out.println("hello world");
    }
    public static void main(String[] args) {
        Thread t1 = new Thread(new NewThread2());
        t1.start();
    }
}
终止线程#
应当尽量避免使用 stop() 方法,它会强制线程终止,释放所有的锁,进而导致一些不一致性问题。
public class StopThread {
    public static User u = new User();

    public static class User {
        private int id;
        private String name;

        public int getId() {
            return this.id;
        }

        public String getName() {
            return this.name;
        }

        public void setId(int id) {
            this.id = id;
        }

        public void setName(String name) {
            this.name = name;
        }

        public User() {
            id = 0;
            name = "0";
        }

        @Override
        public String toString() {
            return "User [id=" + id + ", name=" + name + "]";
        }
    }

    public static class ChangeObjectThread extends Thread {
        @Override
        public void run() {
            while(true) {
                synchronized(u) {
                    int v = (int)(System.currentTimeMillis()/1000);
                    u.setId(v);
                    // Oh, do sth. else
                    try {
                        Thread.sleep(100);
                    } catch (InterruptedException e) {
                        e.printStackTrace();
                    }
                    u.setName(String.valueOf(v));
                }
                Thread.yield(); // 谦让出 CPU 的使用权,下次循环的时候再次竞争
            }
        }
    }

    public static class ReadObjcetThread extends Thread {
        @Override
        public void run() {
            while(true) {
                synchronized(u) {
                    if (u.getId() != Integer.parseInt(u.getName())) {
                        System.err.println(u.toString());
                    }
                }
                Thread.yield();
            }
        }
    }

    public static void main(String[] args) throws InterruptedException {
        new ReadObjcetThread().start();
        while(true) {
            Thread t = new ChangeObjectThread();
            t.start();
            Thread.sleep(150);
            t.stop(); // 不安全,运行时打印结果所示
        }
    }
}
更为稳妥的方式是,在需要终止的线程代码中,人工设置中断标志位,让其正常结束,而不是强制终止。
public class StopThread2 {
    public static User u = new User();

    public static class User {
        private int id;
        private String name;

        public int getId() {
            return this.id;
        }

        public String getName() {
            return this.name;
        }

        public void setId(int id) {
            this.id = id;
        }

        public void setName(String name) {
            this.name = name;
        }

        public User() {
            id = 0;
            name = "0";
        }

        @Override
        public String toString() {
            return "User [id=" + id + ", name=" + name + "]";
        }
    }

    public static class ChangeObjectThread extends Thread {
        // 设置标志位,以安全的方式终止线程
        volatile boolean stopme = false;

        public void stopMe() {
            stopme = true;
        }

        @Override
        public void run() {
            while(true) {
                // 检查标志位,是否应该停止
                if (stopme) {
                    System.out.println("Exit by stopMe()");
                    break;
                }

                synchronized(u) {
                    int v = (int)(System.currentTimeMillis()/1000);
                    u.setId(v);
                    // Oh, do sth. else
                    try {
                        Thread.sleep(100);
                    } catch (InterruptedException e) {
                        e.printStackTrace();
                    }
                    u.setName(String.valueOf(v));
                }
                Thread.yield();
            }
        }
    }

    public static class ReadObjcetThread extends Thread {
        @Override
        public void run() {
            while(true) {
                synchronized(u) {
                    if (u.getId() != Integer.parseInt(u.getName())) {
                        System.err.println(u.toString());
                    }
                }
                Thread.yield();
            }
        }
    }

    public static void main(String[] args) throws InterruptedException {
        new ReadObjcetThread().start();
        while(true) {
            // Thread t = new ChangeObjectThread(); // 多态不能通过编译检查,因为只能调用父类有的方法
            ChangeObjectThread t = new ChangeObjectThread();
            t.start();
            Thread.sleep(150);
            t.stopMe(); // 通过设置标志位安全地停止
        }
    }

}
线程中断#
JDK 对上述过程提供了更好的封装,以便我们可以直接拿来使用。
public void Thread.interrupt();             // 中断线程(这句话只是设置中断标志位,并不会让一个线程终止)
public boolean Thread.isInterrupted();      // 判断线程是否别中断
public static boolean Thread.interrupted(); // 判断是否被中断,并清除当前中断状态
没有根据中断标志做出响应,程序并不会停止。
public class InterruptThread {
    public static void main(String[] args) throws InterruptedException {
        Thread t1 = new Thread() {
            @Override
            public void run() {
                while(true) {
                    Thread.yield();
                }
            }
        };
        t1.start();
        Thread.sleep(2000);
        t1.interrupt(); // 只是设置了中断标志位,实际上程序并没有停止。
    }
}
下面的代码段对中断标志位进行了判断,然后终止了线程。
public class InterruptThread2{
    public static void main(String[] args) throws InterruptedException {
        Thread t1 = new Thread() {
            @Override
            public void run() {
                while(true) {
                    if (Thread.currentThread().isInterrupted()) {
                        break;
                    }

                    try {
                        Thread.sleep(2000);
                    } catch (InterruptedException e) {
                        System.out.println("在睡眠时被中断了,会清除中断标志位");
                        // 重新设置中断标志位
                        Thread.currentThread().interrupt();
                    }

                    Thread.yield();
                }
            }
        };

        t1.start();
        Thread.sleep(2000);
        t1.interrupt();
    }

}
等待(wait)和通知(notify)#
wait() 和 notify() 是由 Object 类产生的,所以,任何对象都可以调用。
我们可以把对象想象成临界资源,在某个线程内对临界资源调用 wait() 方法,表示等一会儿再才能进入临界区。在临界资源上调用 notify() 方法,它会在候选队列中随机选一个候选人,进入临界区。
wait() 和 notify() 必须在 synchronized 函数中才能使用。synchronized 函数包含的区域就是临界区。
public class NotifyThread {
    final static Object object = new Object(); // wait 和 notify 方法可以用于所有对象

    public static class T1 extends Thread {
        @Override
        public void run() {
            synchronized(object) {
                System.out.println(System.currentTimeMillis() + ": T1 启动了");

                try {
                    System.out.println(System.currentTimeMillis() + ": T1 等待某人唤醒");
                    object.wait(); // wait 释放 object 的锁了。
                } catch (InterruptedException e) {
                    e.printStackTrace();
                }

                System.out.println(System.currentTimeMillis() + ": T1 被唤醒了,结束了");
            }
        }
    }

    public static class T2 extends Thread {
        @Override
        public void run() {
            synchronized(object) {
                System.out.println(System.currentTimeMillis() + ": T2 启动了,打算从队列中唤醒某个线程");

                object.notify(); // wait 和 notify 必须放在 synchronized 语句中才能生效

                System.out.println(System.currentTimeMillis() + ": T2 还要睡两秒,还没放弃锁");

                try {
                    Thread.sleep(2000); // sleep 不会放弃锁
                } catch (InterruptedException e) {
                    // e.printStackTrace();
                }
            }
        }
    }

    public static void main(String[] args) {
        Thread t1 = new T1();
        Thread t2 = new T2();
        t1.start();
        t2.start();
    }
}
挂起(suspend)和继续执行(resume)线程#
suspend() 和 resume() 是一个快要废弃的方法了,它们不安全,将会导致数据不一致性问题,如下代码所示。
public class BadSuspend {
    public static Object u = new Object();

    static ChangeObjectThread t1 = new ChangeObjectThread("t1");
    static ChangeObjectThread t2 = new ChangeObjectThread("t2");

    public static class ChangeObjectThread extends Thread {
        public ChangeObjectThread(String name) {
            super.setName(name);
        }

        @Override
        public void run() {
            synchronized(u) {
                System.out.println("in " + getName());
                Thread.currentThread().suspend(); // 挂起,但是不释放锁
            }
            System.out.println("线程" + getName() + "结束了");
        }
    }

    public static void main(String[] args) throws InterruptedException {
        t1.start(); // t1 进入临界区,并挂起
        Thread.sleep(100); // main 线程睡眠 100 ms
        t2.start(); // t2 申请进入临界区,但是 t1 在临界区,无法进入
        t1.resume(); // t1 继续执行
        t2.resume(); // 实际上 t2 并没有解锁成功,因为 resume 先于 suspend 执行了
        t1.join(); // main 线程等待 t1 结束,实际上它正常结束了
        t2.join(); // main 线程等待 t2 结束,但是 t2 没有解锁成功,陷入了死锁
    }
}
如果非要使用,那么可以参考设置标志位的方式修改上面的代码。
public class GoodSuspend {
    public static Object u = new Object();

    public static class ChangeObjectThread extends Thread {
        // 通过设置标志位,让线程正常终止
        volatile boolean suspendme = false;

        public void suspendMe() {
            suspendme = true;
        }

        public void resumeMe() {
            suspendme = false;
            synchronized(this) {
                notify();
            }
        }

        @Override
        public void run() {
            while(true) {
                synchronized(this) {
                    while(suspendme) {
                        try {
                            wait();
                        } catch (InterruptedException e) {
                            e.printStackTrace();
                        }
                    }
                }

                synchronized(u) { // 两个线程竞争 u 的使用权
                    try {
                        System.out.println("in ChangeObjectThread");
                        Thread.sleep(500);
                    } catch (InterruptedException e) {

                    }
                }

                Thread.yield();
            }
        }
    }

    public static class ReadObjectThread extends Thread {
        @Override
        public void run() {
            while(true) {
                synchronized(u) { // 两个线程竞争 u 的使用权
                    try {
                        System.out.println("in ReadObjectThread");
                        Thread.sleep(500);
                    } catch (InterruptedException e) {

                    }
                }

                Thread.yield();
            }
        }
    }

    public static void main(String[] args) throws InterruptedException {
        ChangeObjectThread t1 = new ChangeObjectThread();
        ReadObjectThread t2 = new ReadObjectThread();

        t1.start();
        t2.start();

        Thread.sleep(1000);

        System.out.println("t1 挂起 4 秒,下面 4 秒只有 t2 在执行");
        t1.suspendMe();
        Thread.sleep(4000);

        System.out.println("继续执行 t1 两个线程争抢 CPU 资源");
        t1.resumeMe();
    }
}
等待线程结束(join)和谦让(yield)#
t1.join() 是等待线程 t1 结束。
public class JoinThread {
    public volatile static int i = 0;

    public static class AddThread extends Thread {
        @Override
        public void run() {
            for (i = 0; i < 10000000; i++);
        }
    }

    public static void main(String[] args) throws InterruptedException {
        AddThread t1 = new AddThread();
        t1.start();
        t1.join(); // main 线程等待 t1 线程执行完毕
        System.out.println(i); // 因此结果总是 10000000
    }
}
谦让(yield)是指让出 CPU 的使用权,前面很多代码段都有用到。
volatile 和 Java 内存模型(JMM)#
一般来讲,用 volatile 能保证数据的原子性,但是 volatile 无法保证 (Integer)i++ 的原子性,
因为它的内部实现是,(Integer)i 每增加 1,i 都会指向一个新的 Integer 对象。
public class MultiThreadLong {
    static volatile int i = 0;

    public static class PlusTask implements Runnable {
        @Override
        public void run() {
            for (int k = 0; k < 10000; k++) {
                i++;
            }
        }
    }

    public static void main(String[] args) throws InterruptedException {
        Thread[] threads = new Thread[10];

        for (int i = 0; i < 10; i++) {
            threads[i] = new Thread(new PlusTask());
            threads[i].start();
        }

        for (int i = 0; i < 10; i++) {
            threads[i].join();
        }

        System.out.println("结果异常,这个数字总是小于 100000:" + i);
    }

}
volatile 保证数据的可见性和有序性。
public class Visibility {
    // private static boolean ready = false;
    // private static int number = 12;
    // 声明为 volatile 才能让两个线程看到一致的结果,否则看不到
    private static volatile boolean ready = false;
    private static volatile int number = 12;

    private static class ReaderThread extends Thread {
        @Override
        public void run() {
            while(!ready); // 准备好再执行下一句
            System.out.println(number);
        }
    }

    public static void main(String[] args) throws InterruptedException {
        new ReaderThread().start();
        Thread.sleep(1000);
        number = 42; // main 线程修改数字,ReaderThread 线程能看到
        ready = true;
        Thread.sleep(1000);
    }
}
分门别类的管理:线程组#
public class ThreadGroupName implements Runnable {
    @Override
    public void run() {
        String groupAndName = Thread.currentThread().getThreadGroup().getName()
                                + "-" + Thread.currentThread().getName();
        while(true) {
            System.out.println("线程组和线程名:" + groupAndName);

            try {
                Thread.sleep(3000);
            } catch (InterruptedException e) {
                e.printStackTrace();
            }
        }
    }

    public static void main(String[] args) {
        ThreadGroup tg = new ThreadGroup("PrintGroup");
        Thread t1 = new Thread(tg, new ThreadGroupName(), "T1"); // 将线程和线程组建立联系
        Thread t2 = new Thread(tg, new ThreadGroupName(), "T2");
        t1.start();
        t2.start();
        System.out.println(tg.activeCount()); // 看看这个 tg 线程组中有多少个活跃线程(估计值)
        tg.list();
    }
}
驻守后台:守护线程(Daemon)#
守护线程是最后结束的线程,注意,它会在程序结束后自动退出。 但是有些线程无限循环,则不会退出,它们不属于守护线程。
public class DeamonDemo {
    public static class DaemonT extends Thread {
        public void run() {
            while(true) {
                System.out.println("I am alive");

                try {
                    Thread.sleep(100);
                } catch (InterruptedException e) {
                    e.printStackTrace();
                }
            }
        }
    }

    public static void main(String[] args) throws InterruptedException {
        Thread t = new DaemonT();

        t.setDaemon(true); // 设置为守护进程,驻守后台
        t.start();

        Thread.sleep(2000); // 所有线程结束了,守护进程自然退出
    }
}
先干重要的事:线程优先级#
/**
 * 疑问:这两个 count 内存地址是一样的吗?
 */

public class PriorityDemo {
    public static class HighPriority extends Thread {
        static int count = 0;

        public void run() {
            while(true) {
                synchronized(PriorityDemo.class) {
                    count++;

                    if (count > 10000000) {
                        System.out.println("HighPriority is complete");
                        break;
                    }
                }
            }
        }
    }

    public static class LowPriority extends Thread {
        static int count = 0;

        @Override
        public void run() {
            while(true) {
                synchronized(PriorityDemo.class) {
                    count++;

                    if (count > 10000000) {
                        System.out.println("LowPriority is complete");
                        break;
                    }
                }
            }
        }
    }

    public static void main(String[] args) {
        Thread high = new HighPriority();
        Thread low = new LowPriority();

        high.setPriority(Thread.MAX_PRIORITY);
        low.setPriority(Thread.MIN_PRIORITY);

        // 大多数情况下,high 比 low 先执行完
        low.start();
        high.start();
    }
}
线程安全的概念与 synchronized#
线程不安全的例子。
public class AccountingVol implements Runnable {
    static AccountingVol instance = new AccountingVol();
    static volatile int i = 0;

    public static void increase() {
        i++;
    }

    @Override
    public void run() {
        for (int i = 0; i < 10000000; i++) {
            increase();
        }
    }

    public static void main(String[] args) throws InterruptedException {
        Thread t1 = new Thread(instance);
        Thread t2 = new Thread(instance);

        t1.start();
        t2.start();

        t1.join();
        t2.join();

        System.out.println("结果小于 20000000 就是线程不安全:" + i);
    }
}
线程安全的做法:用 synchronized 加锁:
给对象加锁:临界区是当前对象
给实例加锁:临界区是当前实例
给静态方法加锁:临界区是当前类
示例一:给实例加锁。
public class AccountingVol2 implements Runnable {
    static AccountingVol2 instance = new AccountingVol2();
    static int i = 0;

    @Override
    public void run() {
        for (int j = 0; j < 10000000; j++) {
            synchronized(instance) { // 给实例加锁
                i++;
            }
        }
    }

    public static void main(String[] args) throws InterruptedException {
        Thread t1 = new Thread(instance);
        Thread t2 = new Thread(instance);

        t1.start();
        t2.start();

        t1.join();
        t2.join();

        System.out.println("用同步的方法保证线程安全,结果是 20000000:" + i);
    }
}
实例二:给静态方法加锁。
public class AccountingVol3 implements Runnable {
    static AccountingVol3 instance = new AccountingVol3();
    static volatile int i = 0;

    public static synchronized void increase() { // 给静态方法加锁
        i++;
    }

    @Override
    public void run() {
        for (int i = 0; i < 10000000; i++) {
            increase();
        }
    }

    public static void main(String[] args) throws InterruptedException {
        Thread t1 = new Thread(instance);
        Thread t2 = new Thread(instance);

        t1.start();
        t2.start();

        t1.join();
        t2.join();

        System.out.println("用同步的方法保证线程安全,结果是 20000000:" + i);
    }
}
程序中的幽灵:隐蔽的错误#
无提示的错误案例#
计算结果溢出,也不报错,但是结果错了,出现这个问题将很难调试。
public class Overflow {
    public static void main(String[] args) {
        int v1 = 1073741827;
        int v2 = 1431655768;

        System.out.println("v1=" + v1);
        System.out.println("v2=" + v2);

        int ave = (v1 + v2) / 2;

        System.out.println("ave=" + ave);
    }
}
并发下的 ArrayList#
ArrayList 线程不安全的例子:容器扩容。
import java.util.ArrayList;

public class ArrayListMultiThread {
    // ArrayList 并不是线程安全的,尝试用 Vector 替代也行
    static ArrayList<Integer> a1 = new ArrayList<Integer>(10);

    public static class AddThread implements Runnable {
        @Override
        public void run() {
            for (int i = 0; i < 1000000; i++) {
                // 两个线程在扩容的时候,内部一致性被破坏,抛出了异常
                a1.add(i);
            }
        }
    }

    public static void main(String[] args) throws InterruptedException {
        Thread t1 = new Thread(new AddThread());
        Thread t2 = new Thread(new AddThread());

        t1.start();
        t2.start();

        t1.join();
        t2.join();

        System.out.println(a1.size()); // 结果并不是 2000000 条数据正常返回,而是抛出了异常
    }
}
并发下诡异的 HashMap#
HashMap 线程不安全的例子:容器扩容。
import java.util.HashMap;
import java.util.Map;

public class HashMapMultiThread {
    static Map<String, String> map = new HashMap<String, String>();

    public static class AddThread implements Runnable {
        int start = 0;

        public AddThread(int start) {
            this.start = start;
        }

        @Override
        public void run() {
            for (int i = start; i < 100000; i+=2) {
                // 两个线程在赋值的时候,出现了数据的覆盖,实际数据量少了
                map.put(Integer.toString(i), Integer.toBinaryString(i));
            }
        }
    }

    public static void main(String[] args) throws InterruptedException {
        Thread t1 = new Thread(new HashMapMultiThread.AddThread(0));
        Thread t2 = new Thread(new HashMapMultiThread.AddThread(1));

        t1.start();
        t2.start();

        t1.join();
        t2.join();

        System.out.println(map.size()); // 结果异常,并不是 200000 条数据全部插入成功了
    }
}
初学者常见问题:错误的加锁#
Integer 对象线程不安全的例子:自增运算符。
public class BadLockOnInteger implements Runnable {
    public static Integer i = 0; // 原因是给 Integer 对象赋新值总会新建一个对象
                                 // 而新建的对象是没有锁的
    static BadLockOnInteger instance = new BadLockOnInteger();

    @Override
    public void run() {
        for (int j = 0; j < 10000000; j++) {
            // synchronized(instance) { // 正确的做法
            synchronized(i) { // 错误地加锁,这里的 i 是一个对象不是变量
                i++;          // i 的引用不停地在变化,总是指向新的 Interger 对象
            }
        }
    }
    public static void main(String[] args) throws InterruptedException {
        Thread t1 = new Thread(instance);
        Thread t2 = new Thread(instance);

        t1.start();
        t2.start();

        t1.join();
        t2.join();

        System.out.println("实际结果并不是 20000000,因为加错锁了:" + i);
    }
}
JDK 并发包#
多线程的团队协作:同步控制#
synchronized 的功能扩展:重入锁#
import java.util.concurrent.locks.ReentrantLock;

public class ReenterLock implements Runnable {
    // 创建重入锁对象
    public static ReentrantLock lock = new ReentrantLock();
    public static int i = 0;

    @Override
    public void run() {
        for (int j=0; j<10000000; j++) {
            lock.lock(); // 相比 synchronized,重入锁要手动加锁
            lock.lock(); // 重入锁就是一个线程在自己持有锁的时候,允许重复加锁
            try {
                i++;
            } finally {
                lock.unlock(); // 手动解锁,忘记后就阻塞了
                lock.unlock(); // 重复加锁后,当然解锁也要解两次
            }
        }
    }

    public static void main(String[] args) throws InterruptedException {
        ReenterLock rl = new ReenterLock();
        Thread t1 = new Thread(rl);
        Thread t2 = new Thread(rl);

        t1.start();
        t2.start();

        t1.join();
        t2.join();

        System.out.println(i);
    }
}
中断重入锁
import java.util.concurrent.locks.ReentrantLock;

public class IntLock implements Runnable {
    public static ReentrantLock lock1 = new ReentrantLock();
    public static ReentrantLock lock2 = new ReentrantLock();

    int lock;

    // 控制加锁顺序,方便构造死锁
    public IntLock(int lock) {
        this.lock = lock;
    }

    @Override
    public void run() {
        try {
            if (lock == 1) {
                // 重入锁允许在等待锁的时候被中断(取消执行)
                lock1.lockInterruptibly();

                try {
                    Thread.sleep(500);
                } catch (InterruptedException e) {

                }

                // 需要等待线程 2 释放 lock2(死锁)
                // 重入锁说的是同一个线程允许重复加锁,不同线程对锁资源还是竞争关系
                lock2.lockInterruptibly();
            } else {
                lock2.lockInterruptibly();

                try {
                    Thread.sleep(500);;
                } catch (InterruptedException e) {

                }

                // 需要等待线程 1 释放 lock1(死锁)
                lock1.lockInterruptibly();
            }
        } catch (InterruptedException e) {
            e.printStackTrace();
        } finally {
            if (lock1.isHeldByCurrentThread()) {
                lock1.unlock();
            }
            if (lock2.isHeldByCurrentThread()) {
                lock2.unlock();
            }
            System.out.println(Thread.currentThread().getId() + ":线程退出");
        }
    }

    public static void main(String[] args) throws InterruptedException {
        IntLock r1 = new IntLock(1);
        IntLock r2 = new IntLock(2);

        Thread t1 = new Thread(r1);
        Thread t2 = new Thread(r2);

        t1.start();
        t2.start();

        Thread.sleep(1000);

        // t2.interrupt(); // 终止一个线程,结束死锁
    }
}
给重入锁设置倒计时。
import java.util.concurrent.TimeUnit;
import java.util.concurrent.locks.ReentrantLock;

public class TimeLock implements Runnable {
    public static ReentrantLock lock = new ReentrantLock();

    @Override
    public void run() {
        try {
            // 给锁设置一个等待最大时长 5 秒
            // 如果不设置参数,默认不等待,直接退出竞争
            if (lock.tryLock(5, TimeUnit.SECONDS)) {
                Thread.sleep(6000); // 睡眠 6 秒,肯定有一个线程申请失败
            } else {
                System.out.println("申请锁失败");
            }
        } catch (InterruptedException e) {

        } finally {
            if (lock.isHeldByCurrentThread()) {
                lock.unlock();
            }
        }
    }

    public static void main(String[] args) {
        TimeLock tl = new TimeLock();

        Thread t1 = new Thread(tl);
        Thread t2 = new Thread(tl);

        t1.start();
        t2.start();
    }
}
公平锁。
import java.util.concurrent.locks.ReentrantLock;

public class FairLock implements Runnable {
    public static ReentrantLock fairlock = new ReentrantLock();

    @Override
    public void run() {
        while (true) {
            try {
                fairlock.lock();
                System.out.println(Thread.currentThread().getName() + "获得锁");
            } finally {
                fairlock.unlock();
            }
        }
    }

    public static void main(String[] args) {
        FairLock fl = new FairLock();

        Thread t1 = new Thread(fl, "Thread_t1");
        Thread t2 = new Thread(fl, "Thread_t2");

        t1.start();
        t2.start();
    }
}
重入锁的好搭档:Condition 条件#
synchronized 和 Thread.wait()、Thread.notify() 搭配。
ReentrantLock 和 condition.await()、condition.signal() 搭配。
import java.util.concurrent.locks.Condition;
import java.util.concurrent.locks.ReentrantLock;

public class ReenterLockCondition implements Runnable {
    public static ReentrantLock lock = new ReentrantLock();
    public static Condition condition = lock.newCondition();

    @Override
    public void run() {
        try {
            lock.lock();
            condition.await(); // 等待唤醒,释放锁
            System.out.println("线程被唤醒了,继续执行");
        } catch (InterruptedException e) {
            e.printStackTrace();
        } finally {
            lock.unlock();
        }
    }

    public static void main(String[] args) throws InterruptedException {
        ReenterLockCondition tl = new ReenterLockCondition();

        Thread t1 = new Thread(tl);

        t1.start();

        Thread.sleep(2000);

        lock.lock(); // 先获得锁,才能执行 awati/signal 方法
        condition.signal(); // 唤醒 t1
        lock.unlock();
    }
}
允许多个线程同时访问:信号量(Semaphore)#
信号量允许多个线程访问一个资源。synchronized 和 ReentrantLock 只允许一个线程访问资源。
import java.util.concurrent.ExecutorService;
import java.util.concurrent.Executors;
import java.util.concurrent.Semaphore;

public class SemaphoreDemo implements Runnable {
    // 信号量可以让【多个线程】同时访问临界资源
    // synchronize 和 ReentrantLock 只能让一个线程访问临界资源
    final Semaphore semp = new Semaphore(5); // 创建 5 个许可

    @Override
    public void run() {
        try {
            semp.acquire(); // 申请一个许可
            Thread.sleep(2000);
            System.out.println(Thread.currentThread().getId() + ":done");
            semp.release(); // 释放一个许可
        } catch (InterruptedException e) {
            e.printStackTrace();
        }
    }

    public static void main(String[] args) {
        // 创建一个包含 20 个线程的线程池
        ExecutorService exec = Executors.newFixedThreadPool(20);
        final SemaphoreDemo demo = new SemaphoreDemo();

        for (int i = 0; i < 20; i++) {
            exec.submit(demo); // 提交 20 个任务到线程池
        }
    }
}
ReadWriteLock 读写锁#
import java.util.Random;
import java.util.concurrent.locks.Lock;
import java.util.concurrent.locks.ReentrantLock;
import java.util.concurrent.locks.ReentrantReadWriteLock;

public class ReadWriteLockDemo {
    // 读写分离锁,让读线程之间非阻塞,极大提高读取效率
    private static Lock lock = new ReentrantLock();
    private static ReentrantReadWriteLock readWriteLock = new ReentrantReadWriteLock();

    private static Lock readLock = readWriteLock.readLock();
    private static Lock writeLock = readWriteLock.writeLock();

    private int value;

    // 处理读事件
    public Object handleRead(Lock lock) throws InterruptedException {
        try {
            lock.lock();
            Thread.sleep(1000);
            return value;
        } finally {
            lock.unlock();
        }
    }

    // 处理写事件
    public void handleWrite (Lock lock, int index) throws InterruptedException {
        try {
            lock.lock();
            Thread.sleep(1000);
            value = index;
        } finally {
            lock.unlock();
        }
    }

    public static void main(String[] args) {
        final ReadWriteLockDemo demo = new ReadWriteLockDemo();

        Runnable readRunnable = new Runnable() {
            @Override
            public void run() {
                try {
                    demo.handleRead(readLock); // 使用读锁
                    // demo.handleRead(lock); // 使用重入锁
                } catch (InterruptedException e) {
                    e.printStackTrace();
                }
            }
        };

        Runnable writeRunnable = new Runnable() {
            @Override
            public void run() {
                try {
                    demo.handleWrite(writeLock, new Random().nextInt()); // 使用写锁
                    // demo.handleWrite(lock, new Random().nextInt()); // 使用重入锁
                } catch (InterruptedException e) {
                    e.printStackTrace();
                }
            }
        };

        for (int i = 0; i < 18; i++) {
            new Thread(readRunnable).start();
        }

        for (int i = 18; i < 20; i++) {
            new Thread(writeRunnable).start();
        }
    }
}
倒计时器:CountDownLatch#
import java.util.concurrent.CountDownLatch;
import java.util.concurrent.ExecutorService;
import java.util.concurrent.Executors;
import java.util.Random;

public class CountDownLatchDemo implements Runnable {
    static final CountDownLatch end = new CountDownLatch(10); // 计数器
    static final CountDownLatchDemo demo = new CountDownLatchDemo();

    @Override
    public void run() {
        try {
            Thread.sleep(new Random().nextInt(10) * 1000);
            System.out.println("支线线程执行完成");
            end.countDown(); // 计数器 -1
        } catch (InterruptedException e) {
            e.printStackTrace();
        }
    }

    public static void main(String[] args) throws InterruptedException {
        ExecutorService exec = Executors.newFixedThreadPool(10);

        for (int i = 0; i < 10; i++) {
            exec.submit(demo);
        }

        end.await(); // 等待计数器减为零
        System.out.println("主线线程执行完成");
        exec.shutdown();
    }
}
循环栅栏:CyclicBarrier#
import java.util.concurrent.BrokenBarrierException;
import java.util.concurrent.CyclicBarrier;

// 模拟场景:司令让一组士兵执行任务
// 1. 士兵集合
// 2. 士兵执行任务
// 3. 司令宣布任务执行完成
public class CyclicBarrierDemo {
    public static class Solider implements Runnable {
        private String solider;
        private final CyclicBarrier cyclic; // 循环栅栏

        // 构造器方法
        public Solider(CyclicBarrier cyclic, String soliderName) {
            this.cyclic = cyclic;
            this.solider = soliderName;
        }

        // 每个士兵都会执行 run 方法
        @Override
        public void run() {
            try {
                cyclic.await(); // 如果有 10 个线程在等待,计数器减为 0 就执行 barrireAction
                doWork();
                cyclic.await(); // 再一次等待,凑齐 10 个线程
                doWork();
                cyclic.await(); // 再一次等待,凑齐 10 个线程
            } catch (InterruptedException e) {
                e.printStackTrace();
            } catch (BrokenBarrierException e) {
                e.printStackTrace();
            }
        }

        void doWork() {
            try {
                Thread.sleep(1000);
            } catch (InterruptedException e) {
                e.printStackTrace();
            }
            System.out.println(solider + " 任务完成");
        }
    }


    public static class BarrierRun implements Runnable {
        boolean flag;
        int N;
        static int i = 1;

        // 默认构造器
        public BarrierRun(boolean flag, int N) {
            this.flag = flag;
            this.N = N;
        }

        @Override
        public void run() {
            if (flag) {
                System.out.println("司令:任务完成");
            } else {
                System.out.println("司令:集合完毕");
                flag = true;
            }
            System.out.println("BarrierRun 执行了 " + (i++) + " 次");
        }
    }

    public static void main(String arg[]) throws InterruptedException {
        final int N = 10;
        Thread[] allSolider = new Thread[N];
        boolean flag = false;

        /**
         * 循环栅栏的工作流程:
         * 当到达栅栏的线程数量达到设定值后,执行 barrierAction,也就是这里的 BarrierRun。
         *
         * 如何判定数量是否达到了呢?
         * 因为每个线程都会在栅栏处等待,cyclic.await() 可以借此计数。
         *
         * 如何理解循环?
         * 可以多次调用 await() 函数,每次调用都会重新凑齐设定数目的线程,然后翻越屏障。
         * 执行 barrierAction
         */
        CyclicBarrier cyclic = new CyclicBarrier(N, new BarrierRun(flag, N));

        System.out.println("集合队伍!");

        for (int i = 0; i < N; i++) {
            System.out.println("士兵 " + i + " 报道!");
            allSolider[i] = new Thread(new Solider(cyclic, "士兵 " + i));
            allSolider[i].start();
        }
    }
}
线程阻塞工具类:LockSupport#
import java.util.concurrent.locks.LockSupport;

// 对比 suspend 实现,这个不会发生无限等待问题
public class LockSupportDemo {
    public static Object u = new Object();
    static ChangeObjectThread t1 = new ChangeObjectThread("t1");
    static ChangeObjectThread t2 = new ChangeObjectThread("t2");

    public static class ChangeObjectThread extends Thread {
        public ChangeObjectThread(String name) {
            super.setName(name);
        }

        @Override
        public void run() {
            synchronized (u) {
                System.out.println("线程 " + getName() + " 开始");
                LockSupport.park(); // 如果能够申请到许可,继续执行,申请不到就阻塞当前进程
                System.out.println("线程 " + getName() + " 结束");
            }
        }
    }

    public static void main(String[] args) throws InterruptedException {
        t1.start();
        Thread.sleep(100);
        t2.start(); // 申请许可没有成功,等待 t1 释放许可,但是不阻塞
        LockSupport.unpark(t1); // t1 释放一个许可(类比信号量,但不完全是信号量,因为只有一个许可)
        LockSupport.unpark(t2); // t1 已经释放了许可,t2 的许可无效。
        t1.join();
        t2.join();
    }
}
给 LockSupport.park() 方法设置中断。
import java.util.concurrent.locks.LockSupport;

public class LockSupportIntDemo {
    public static Object u = new Object();
    static ChangeObjectThread t1 = new ChangeObjectThread("t1");
    static ChangeObjectThread t2 = new ChangeObjectThread("t2");

    public static class ChangeObjectThread extends Thread {
        public ChangeObjectThread(String name) {
            super.setName(name);
        }

        @Override
        public void run() {
            synchronized (u) {
                System.out.println("线程 " + getName() + " 开始");
                LockSupport.park(); // park() 方法支持中断

                if (Thread.interrupted()) {
                    System.out.println("线程 " + getName() + " 被中断了");
                }

                System.out.println("线程 " + getName() + " 结束");
            }
        }

        public static void main(String[] args) throws InterruptedException {
            t1.start();
            Thread.sleep(100);
            t2.start();
            t1.interrupt(); // 中断 t1
            LockSupport.unpark(t2);
        }
    }
}